 When you first start cycling, it can seem hard to take good bike touring photos.
Too many of us have returned home with dull photos that show little more than empty roads and hardly reflect the exciting trip we remember. Andrew & I should know because our first year of bike touring photography was hardly inspiring. We’ve learned a lot since those early days, however – largely thanks to other cycling photographers who showed us a few tricks.
In this post, we give you 8 tips for better photography during a bike tour. The advices comes from us and from bike tourists who are known for their great picture-taking skills: Paul Jeurissen, Dennis Koomen and Harry Kikstra.
1. Know Your Camera. “Sometimes you have to quickly change shutter speed and aperture or maybe your ISO. If this takes you 5 minutes, probably the situation is gone. To learn how to use your camera, read the manual then go outside and take a few of the same pictures but with different settings. Try it with close-ups, landscapes, high-contrast and low-light situations etc. Go home and look at which picture you like the most and remember the settings for these specific situations,” says Dennis.

Sometimes you have to be quick to grab the moment. Photo by TravellingTwo.
2. Keep Your Camera Nearby. “During a bike trip, great photo opportunities can happen within seconds. You’ll see colorful locals cycling in the opposite direction, kids running towards you and even elephants that seem to appear from nowhere. So try to keep your camera close by in a handlebar bag or shirt pocket. That way you won’t miss these shots by having to spend extra time rummaging through a pannier for it,” says Paul.

Keep that camera handy so you can grab a quick shot. Photo by Paul Jeurissen.
3. Put Something In The Background. “When you see an object like a distance marker or a funny traffic sign, take the picture with something in the background; for example, your friend cycling past. It becomes more lively and has more depth. Focus on the object and try to make the background a bit blurry; just enough so that you can still see what’s happening,” says Dennis.

Cycling In Scotland. Photo by Dennis Koomen.
4. Optimize Wisely. “This has different meanings, depending on the moment. It could mean getting the best lens and camera setting, or shooting as fast as possible. Never loose a quick shot because you think you have the wrong lens on, the light is wrong, and never change settings if it needs too much time. Just shoot and see later if it worked out. If you have the time and are waiting for a nice sunset, then optimize in getting the right spot and light, setting up your tripod, lens etcetera,” says Harry.

Ivana cycling in the mist. Photo by Harry.
5. Pick Your Viewpoint. “Even if there are no interesting features in the landscape such as rocks or plants that you can include in your photo, you still can take unusual and interesting photos by shooting from other camera standpoints. Instead of just standing on the road, try holding the camera above your head, sitting or even laying down. Changing the camera standpoint makes a big difference to how the photo finally turns out,” says Paul.

A unique viewpoint can make all the difference. Photo by Paul Jeurissen.
6. Don’t Be Afraid To Ask. “Sometimes you see a person or situation that would be great to photograph but you don’t take the photo because you’re afraid people will mind. Don’t be scared. Just ask. Most people are very kind and won’t mind having their picture taken. Many are even flattered. It helps if you can make a connection with them first. Say hello and start a conversation and then pop the question. Usually the answer is “yes” with a smile,” say Friedel & Andrew.

This couple were happy to pose for the camera, after we stopped to chat. Photo by TravellingTwo
7. Use A Cyclist To Show Scale. “Mountains are huge and deserts can be immense. How do you bring the enormity of the landscape to your photo? By stepping back and zooming in on a cycling partner. As you can see in the picture below, the small red cyclist gives a sense of scale to the landscape. Try putting a finger over the photo and blocking out the cyclist. You might think that the photo was taken in a child’s sandbox,” says Paul.
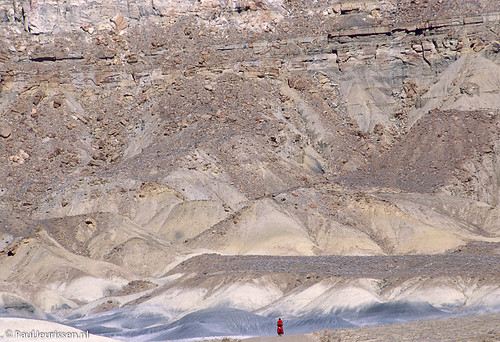
A small cyclist stands out against a big landscape. Photo by Paul Jeurissen.
8. Lose The Bike And The Cyclists! “Yes, I know these are cycling photography tips but trust me, having a cyclist or bicycle in each and every photo is boring for every non-cyclist as the bike usually is the centre of attention and it hardly ever changes. Cyclists don’t have a large wardrobe either. Shoot yourselves and others off the bike as well, and bikes without their riders. Remember that the bike is basically a transportation device to see wonderful people and places and enables a different lifestyle. You spend more time camping, cooking, talking to people etc than actually cycling, so show that as well. Where and how do you park your bike, pitch your tent, shop for food?,” says Harry.

Ivana jumping in Salar de Uyuni. Photo by Harry.
Want even more great photo tips? Check out: